[dropcap]I[/dropcap]f you are looking for some way to speed up your wordpress site to load fast and improve performance with some simple and really easy steps, you are at right place. Just walk through this post and give a new life to your website. Visitors will not just like your website but love it!! By the way do you know our website is as fast as top word class websites like Amazon, Flipkart and Facebook, NO, check out here.
P.S. You can also read how to improve Alexa ranking of your website.
[hr]
How to check the website performance?
Before you really start improving the performance you first need to know where do you stand. There are many free online websites and they will not just help you to determine the performance of your website but guide you to right direction. Few of them are listed below:-
1. GTmetrix.com : I like this website over other tools because its easy to understand has more test centers i.e. you can virtually test the performance of your website from different locations as if you are accessing your website directly from those test centers.
2. Pingdom.com : This is one of the famous and used by many website developers. You cannot just test the performance but can also check the health of your DNS and results are mostly very quick.
3. Google PageSpeed Insights : This is another tool that will help you. This will test the performance and user experience for your both desktop and mobile version website simultaneously. You should defiantly test your website once here as Google will put on top in the search result if you have higher score otherwise down.
[hr]
Speed up your wordpress site to load fast:
Now as you know the speed the next immediate steps would be to speed up your wordpress site to load fast. I have gone through many posts and blogs for the same and what I learnt is that they look complex and scary but they are really easy. Some will work for you and some will not. If you try something which doesn’t work for you, you stop trying others. So to make it simple for you I am listing some really easy steps that will defiantly work for you. You must try them once and believe me you will thank me one day. Here we go…
Step 1: Use CDN
 You might have heard this suggestion before but gave up thinking it would be complex to setup or costly. But let metell you, you are wrong either way. One of the CDN that I will suggest you is Cloudflare.com and its free plus really easy to setup. The really quick steps are:-
1. Signup and create account:
The first obvious step is to create an account visiting the website Cloudflare.com. Before you signup please check if your hosting provider is already a partner with Cloudflare. You may check here. If so, you just need to login to your cPannel and create a cloudflare account from there.
2. Add your website to cloudflare :
 Once you have verified your email address used for registration login to cloudflare and add your website (without http://www). Cloudflare may take some time, around 1 minute, to scan your DNS settings.
3. Setup your DNS and other entry :
 Once the scanning of your DNS setting is done click on Continue setup. By now cloudflare would have already detected your DNS setup and listed all your entries. Just go through them and make sure nothing is missing. If you have any sub-domain associated with your website, please add them against the Type “A”. For example if your website. For example if your website is http://www.helloworld.com and sub-domain is like http://my.helloworld.com just add “my” against the type “A”. You may also check this and this. Click on “I have added all my records, Continue”
4. Setup your setting to speed up your wordpress site :
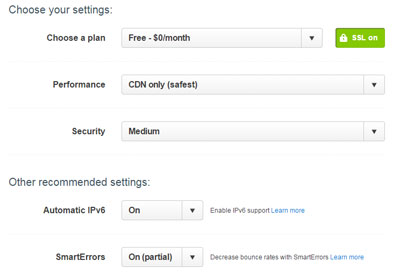 Now in the next screen you can opt for different options to speed up your process. You can defiantly explore other better option to speed up the process and reach to a optimum setting for your site but here I am going to tell you very basic which will work for you and will see positive result. Once done click on “Continue” . .
5. Update your name servers :
 Most people stop here!! Hope you will not. Cloudflare will tell you the current name server you are using and will give you the new server name (as shown in the screen-print) for them so that Cloudflare can rout your server traffic over cloudflare CDN server. Its easy to change the name server name. If you are using Godaddy this link may help. You would be able to revert back to your original name server any time if you want to. Once the name server is update it may take some time, around 5 minutes, to reflect the changes. A green check box will appear once it is reflected at cloudflare.
6. Setup cloudflare setting to gain speed :
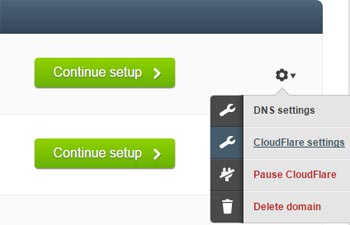 Now click on the gear icon against your website and select “cloudflare settings”. Again i am listing here the very basic setting you can go with. you can always play around and check what is working best for you.
Setting Overview
- Performance profile : CDN Only
- Development Mode : Off
- Automatic IPv6 : Full
- Pseudo IPv4 : Off
- SPDY : Enabled
- Always Online : On
- IP Geolocation : On
*Leave other settings as it as
Security Settings:
- Security profile : Medium
- Advanced DDoS protection : Off
- Basic protection level : Medium
- Challenge passage TTL : 1 Hour
- E-mail address obfuscation : On
- Server side exclude (SSE) : On
- Browser integrity check : On
- Hotlink protection : On
- Advanced security (Web Application Firewall) : On
Leave other setting as is
Performance setting :
- Performance Profile : CDN Only
- Caching : Simplified
- Minimum expire TTL : 4 Hours
- Auto Minify (Web optimization) : Off (select non). This is because you will be using W3 Total cache to minify. If you do not want to use W3 Total Cache enable all of them (JS, CSS, HTML)
- Rocket Loader™ (Web optimization) : Off
Leave other settings as is
7. check the speed of your website again:
Now it is time to see the result. Give it some time around 10 minutes and check the performance of your website again using GTmetrix.com I am sure you will see reasonably increase in performance. But hold on, you are not done yet. You can still improve the performance, please jump to second step.
[hr]
Step 2 . Install W3 Total Cache :
 W3 Total Cache is one of the most downloaded wordpress plugin and highly recommended. I am sure you have heard this name before. If you haven’t tried it yet. Please install and active this today. Once the plugin is installed you will see a new entry in your wordpress admin area called “Performance” now follow the basic setting described below:-
1. Performance –> General Settings
- Page Cache : Enable (Disk : Enhanced)
- Minify : Enable
- Minify Mode : Manual
- Browser Cache : Enable
Save changes and leave other setting as is
<
2. Performance –> General Settings –> Page cache
General :
- Cache front page : Enable
- Don’t cache pages for logged in users : Enable
- Don’t cache pages for following user roles : Enable (for Administrator)
Cache Preload :
- Automatically prime the page cache : Enable
- Update interval : 900 seconds
- Pages per interval : 10
Advanced:
- Garbage collection interval : 3600
- Comment cookie lifetime : 1800
Save changes and leave other setting as is
3. Performance –> General Settings –> Browser cache
General:
- Set Last-Modified header :Enable
- Set expires header :Enable
- Set cache control header :Enable
- Set entity tag (eTag) :Enable
- Set W3 Total Cache header :Enable
- Enable HTTP (gzip) compression :Enable
- Prevent caching of objects after settings change :Disable
- Don’t set cookies for static files :Enable
- Do not process 404 errors for static objects with WordPress :Enable
CSS & JS :
- Set Last-Modified header : Enable
- Set expires header : Enable
- Expires header lifetime :31536000 seconds
- Set cache control header : Enable
- Set entity tag (ETag) : Enable
- Set W3 Total Cache header : Enable
- Enable HTTP (gzip) compression : Enable
- Prevent caching of objects after settings change : Disable
- Disable cookies for static files : Enable
HTML & XML:
- Set Last-Modified header : Enable
- Set expires header : Enable
- Expires header lifetime : 7200 Seconds
- Set cache control header : Enable
- Set entity tag (ETag) : Enable
- Set W3 Total Cache header : Enable
- Enable HTTP (gzip) compression : Enable
Media & Other Files:
- Set Last-Modified header :Enable
- Set expires header :Enable
- Expires header lifetime :31536000 Seconds
- Set cache control header :Enable
- Set entity tag (ETag) :Enable
- Set W3 Total Cache header :Enable
- Enable HTTP (gzip) compression :Enable
- Prevent caching of objects after settings change : Disable
- Disable cookies for static files : Enable
Save changes for each section before moving to next and leave other settings as it
4. Link your Cloudflare and W3 Total Cache (Optional)
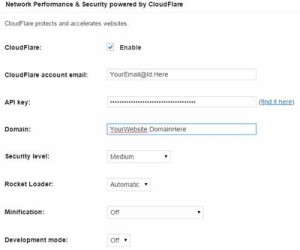 You can link you cloudflare account with W3 Total Cache, see how things are going easy, for the same first you need to get your cloudflare api key. Login to your cloudflare account and click on the menu “Account” at the bottom of the page you will get your API Key. Now navigate to Performance –> General setting in your wordpress admin and scroll down untill you get Cloudflare beneath “Network Performance & security powered by CloudFlare”. Enter the detail as follows:-
- CloudFlare : Enable
- CloudFlare account email : Your registerd email
- API key : The one you got from cloudflare
- Domain : Domain name without http://
- Security level : Medium
- Rocket Loader : Off
- Minification : Off (you can also enable it for HTML, CSS and JS and check if this improves your performance)
- Development mode : Off
Save the changes.
5. check the speed of your website again:
Its time to check the speed of your website again and see the result of efforts we have put so far. Check through GTmetrix.com or any other website. You will be amazed to see how fast your website has become. But remember you can further unlock your website potential and give extra boost. If interested read further.
[hr]
Step 3. Remove query strings from static resources :
 When you check the performance of your website either through GTmetrix.com or Pingdom.com you will see some score against the entry “Remove query strings from static resources”. In a layman terminology this is blocking the performance so to speed up your wordpress site to load faster you need to deal with it. The good news is, its really easy. What you need to do is to place the following code at the bottom of your themes function.php. You do not need to do this through FTP. Just access your wordpress admin area and navigate to Appearance –> Editor –> and now select Theme Functions (This will probably appear right hand side of your screen). Just place the below code at the bottom:-
/* START : Below line of codes will Remove query strings from static resources*/
function _remove_script_version( $src ){
$parts = explode( ‘?’, $src );
return $parts[0];
}
add_filter( ‘script_loader_src’, ‘_remove_script_version’, 15, 1 );
add_filter( ‘style_loader_src’, ‘_remove_script_version’, 15, 1 );
/* END: Above lines of code will Remove query strings from static resources*/
[hr]
Step4. Combine external CSS / Remove render-blocking JavaScript / Optimize CSS Delivery:
This is optional step if you do not feel comfortable just skip and test the performance of your website improved by previous step and move to next step. If you want to give this a try please come along with me.
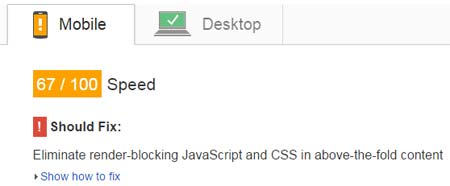 When you check the performance of your website using Pingdom.com it will give you score against entry “Combine external CSS” and will list all external CSS. You can also get the list by GTmetrix.com against the entry “Minify CSS”. You can also check Google PageSpeed Insights and get the CSS under the entry “Eliminate render-blocking JavaScript and CSS in above-the-fold content”, click on show how to fix and then you will see your CSS under “Optimize CSS Delivery”. Now copy the CSS you have got by all these websites and paste in a notepad. Please make sure you only have the unique entry in your notepad and no duplicates.
 Now go to wordpress admin –> Performance –> Minify –> now scroll down until you get CSS. Make sure you have following settings
- CSS minify settings :Enbale
- Line break removal (not applied when combine only is active) : Enable
- CSS file management : Your active theme is selected
Now under the File URI enter your CSS from notepad one by one, save changes, test the website nothing is broken, select next CSS from notepad, test the website nothing is broken.. and go on.. do not add any CSS that is creating any problem.
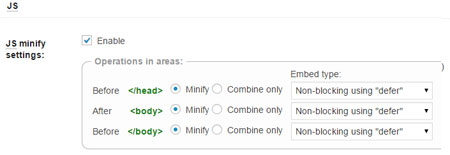 You can follow the exact same step for JS
JS minify settings: Enable
select minify for <head>, <body> and </Body>
Embed type: Non blocking using defer
Now in the File URI enter all your JS one by one. You can get the list of JSs same way as you got CSS from those websites.
[hr]
Step 5. Optimize the image:
Optimizing your images is another important steps in order to speed up your wordpress site to load fast. Like any other steps this is also really easy and doesn’t requires much effort. When you test your website through GTmetrix.com you will get some score against the “Optimize images”. Just click on the link and you will get list of all images that are not optimized. GTmetrix.com will also give you the optimized version of those images. Just click on that link, download the file and upload the optimized image to your website. Really simple.
Photoshop is the great tool to crop your images close to the exact size and it can be used further to save the website friendly format of the photo. Please see this post or get some videos here on how can you optimize your photo for website.
If you dont have photoshop you can still use free online tools like Image Otimizer or ysmush to optimize your image and speed up your wordpress site to load fast. Test your website again and feel happy.
[hr]
Step 6. A bit more:
By now you will agree with me that these steps are really simple and there is no reason you should not try them. I hope this post of of some help for you. I you have any further suggestion or the post is missing anything please post your comments below. Our journey doesn’t end here. Improving performance to speed up your wordpress site is not one time activity, it is a continuous process so if you come across any other short, easy and quick way please share with us., after all we all love fast website!!


